Honda Motorcycles - FireBlades.org banner

Tutorial-How to Rewind a Smoked Charging Stator

117K views 110 replies 18 participants last post by  Kikato  
#1 · (Edited)
Before we get down to buisness i would first like to say that I am in no way responsible for any problems or blown parts as a result of following this tutorial, do so at your own risk! Not every bike is the same electrically and not every bike uses the same winding pattern. Do not attempt to rewind your stator unless you feel confidant in your ability to do so correctly. errors in the number of turns or placement of the poles for each phase can result in your voltage regulator/recitfier letting the magic blue smoke out.

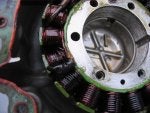
lets briefly go over stators and how the stator works in the alternator. a alternators job is to turn mechanical power from the engine into electrical power for the lights, turnsignals and most importantly the ignition. the alternator usualy does this with a permantly magnetic rotor
Image

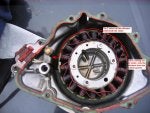
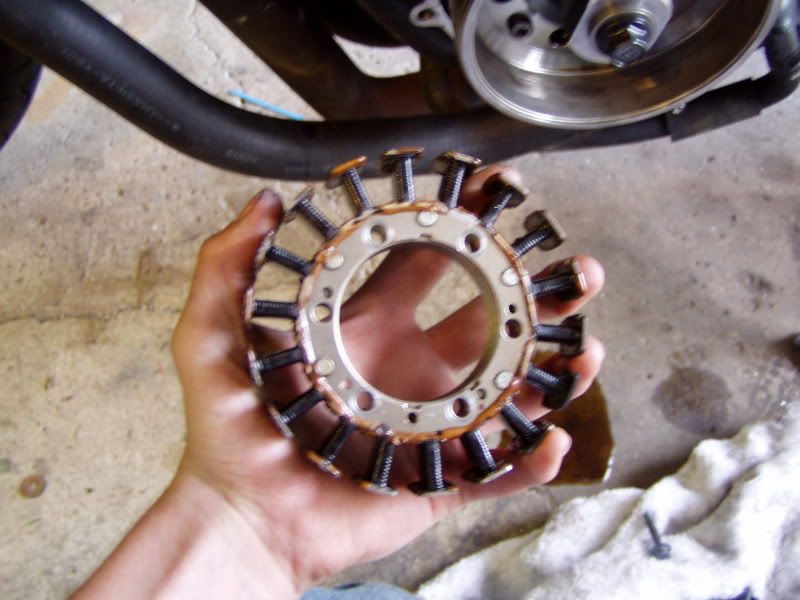
and a electromagnetic stator.
Image
(unwound)

as the rotor rotates around the stator, the magnets in the rotor react with the coiled wire and iron in the stator (you can see the individual magnets in the pic of the rotor if you look closely). the poles on the rotor alternate north and south and as such alternate the voltae coming out + and -. this is done at a rather high frequecny based on the engine's RPM. these alternating currents (might be voltage but i dont know for sure) are then picked up by your voltage regulator, turned into rectified DC current and limited in voltage. that power is then used for all your bikes electrial needs and the excess power is stored in the battery.

If anyone has ANY questions AT ALL, feel free to PM me or shoot me a email at mbxofna@yahoo.com ill do what i can to help
 
#2 ·
please add details. like where you get the wire from, do you coat the wire yourself? how do you jump from pole to pole?

i've had a 2nd aftermarket stator give continuity right after installing. not even 5 minutes. They have warranty and i'll get it changed but i've been down off and on for 2 weeks now. and i'm going to attempt a stator winding myself now.
 
#6 ·
I get my wire from a local industrial motor winding company but i have gotten wire from alliedelect.com before. Its under the magnet wire section and its listed as polyester polymidemide enamled wire. Its rated for 200*C which is needed for the hostile conditions inside a motor. The wire i get from the local place is rated for 220C! I'll also go over how to varnish the stator once its wound. if done correctly you will have a stator just as good if not better then the stock stator (aftermarket stators are usually junk)

there are a few different ways to jump poles. ill go over all that once i start the winding process on monday. Ill also go over a few different winding patterns and some theory.
 
#3 ·
The failure and unwinding proccess

The reason why my stator failed was a odd series of events. A screw came loose on the charging rotor and hit a screw on the stator. this created metal chips and a couple of them stayed inside the rotor. they eventually embedded themselves in the hammer head and deformed it as you can see in the pic the laminations shifted and cut into the wire thus shorting that pole and eventually the phase.
Image


Unfortunatly I didnt take pics of the stator as i was unwinding it. Its pretty straightforward. all you do is just pull on a single strand at a time and count the the number of times it goes around the pole and how many poles are between the poles on the same phase. also check the direction the wire is wound in. some winds have poles that are wound bacwards from the others(DLRK, and imbalanced). you will also want to mic the wire and determine the wire guage. MAKE SURE YOU WEAR GLOVES AND USE PLUERS FOR TIGHTS SPOTS... THE BROKEN VARNISH AND INSULATION CAN CUT YOU

to makeit easier to remember patterns most use a simple sequecne of letters to show where each pole is on the stator and what direction there wound. we will use my stator as an example. It's wound sequentially and is noted as ABCABCABCABCABCABC. If you count there are 18 letters, these correspond to the 18 poles on the stator. these stators are 3 phase, this usually means 3 main strands of wire, though a single strand may consist of multiple strands in parallel. All the A's are wound with the same strand. same with the B's and C's. some winds have reverse would poles. in which case the letter is lower case. Torque Imballanced (electrical torque not mechanical!! it is DIFFERENT) is this way. its noted as AaBbCcAaBbCcAaBbCcAaBbCcAaBbCcAaBbCc. This may not make a lot of sense right now but it will once i post some pics with this idea.

My stator is ABCABCABCABCABCABC, 37 turns of 18 guage wire.
 
#4 ·
Re: The failure and unwinding proccess

My stator is ABCABCABCABCABCABC, 37 turns of 18 guage wire.
If you're using a mic to measure the thickness of the wire perhaps give us that measurement (in millimeters of course) instead of gauge. I think only the US still uses wire gauge and I don't think you can get wire gauge micrometers?
 
#17 ·
I've heard of other people trying to rewind the 929 stators and they've failed after a few k's of km's on the bike. since i have an old burnt stator, i think i can wind it though and want to learn how.

i just received another stator under warranty cause the last one burnt out after 50 km's. continuity between phases and to the base. I put the new one in yesterday ( stupid me i didn't check continuity beofre installation ) but after 5 minutes of idling, i noticed voltage dropping very slightly. pulled stator out again, and again continuity between phases. There are absolutely no burn marks on the stator, and look new ( obviously ) except for it being coated with a little oil. Long story short. could the RR have blown this stator and how? plus wouldn't there be burnt out poles if the wire was to ground out?

i personally think it's another dud and am getting pissed off with this company. customer service is top notch with them though.
 
#18 ·
if not wound with the right wire a hand wound stator will fail everytime, same if its not wound neatly and properly. since ambient temp in the case is upwards of 120 *c you need to wire with the right enamel coating. your typical enameled wire is only rated for 150*C so it will fail even if its been varnished. industrial motor wire is usually rated for 200-220 C. polyester polymidemide enameled is one of my favorites though pricey ($40 USD per lb). unless theres a short somewhere else on the bike you would be hardpressed to blow up a stator done with high temp wire, neatly wound and varnished.

its possible that you just got 2 duds but not very likly. a bad voltage reg/rec or battery will blow them up but it usually takes a little more time and rpm then 5 mins idleing. How many wires are coing out of your stator? 3 or 5?
 
#26 ·
Alright. I ended up getting only a phase done, this 18 guage wire is much harder to work with then any of the other guages ive used in the past. i guess its not surprising it took a little longet then i expected. the phase took me a little over an hour to do. it is 37 turn, 12 turns per layer. the 37th is the first half turn and the last half turn. with the lack of room i ditched the zigzag and just did it the same way as the factory wind: straingt over on the backside.

http://i71.photobucket.com/albums/i156/MTXMUGEN/P1010027.jpg
http://i71.photobucket.com/albums/i156/MTXMUGEN/P1010028.jpg

this is not the neatest winding job ive done. 3 layers is hard do and still be neat since a gap on the first layer will cause 2 on the second and 3 on the 3rd. my problem on this stator ws getting the crosses done w/o taking up too much room

To wind properly:
start at the inside of the pole and stat wrapping the wire from there. try to get the wire to lay next to the previous one as much as possibe. you dont want ANY gaps. it is a good idea to also set how many to wind per layer. for my stator i was able to get 13 on the first, 25 on the second then the rest on the last. a small screwdriver with all the edges smothed off will help squeeze the wire and close any gaps. just be careful not to scratch the wire. I also use a set of needle nose pliers with all the teth ang esdes ground smooth. those will help pinchthe wire closer to the iron on the straight portions, wire tends to bow out.
 
#31 · (Edited)
The wire is enamaled. I dont know what this wire is enamled with but its pretty tough stuff. most lower temp wires are enamled with a nylon based insulation where as higher temp wire tends to be polyester based. it really depends on what regulations the motor shops follow. as long as its rated for ~200C your fine.

Yes, the stator will be varnished and baked when I'm done. if yuo ahev good wire and wind tight enough you dont have to varnish it but its it allways a good idea. I'll be varnishing mine and baking it myself (just need to find my old toaster oven!) ill include that in the tutorial

yes, 13, 12, and 12. you allways count from the front of the stator. the back has the crossovers and the terminations.

THERE IS A FRONT AND BACKSIDE TO THEM even before you wind. the clip that screws into the backside of the stator. the hole goes all the way through but its only threaded on the one side.

I know i forget to say little things like this in the tutorial so PLEASE ask if you dont see something or if I went over something too quick.
 
#32 ·
when I got my bike the stator went in the first 1000 miles. Bought an aftermarket stator and it failed in about 1000 miles again. Although it was wound with 16ga (stock is 17) the three solder joints were not staggered and they melted together. RM Stators was good enough to send me a replacement, so while waiting for it to arrive I wound the original. The trouble was that I could only find 19ga. wire. So it only lasted about 4500 miles. If I can find some 16 or 17 ga. wire I will do it again. I had some painful blisters the first time so in the future I plan to break the winding part up over 6 evenings or so. A local auto electric shop sold me some spray to coat everything with.
 
#33 ·
THATS WHO I BOUGHT MY STATOR FROM.

The second went on me just now. thats the one i mentioned earlier how it was already getting continuity right after the install, 5 minutes after running ( it may have been showing continuity right from the start but i didn't check ). The person called me yesterday (mike ) but i missed the call. I'll see what he says today.
 
#37 · (Edited)
here's pics of the 1st stator. The tech admitted that he shouldn't have used the metal clamp to hold the wires in place ( as you can see it burnt out the wires, and probably some of the poles.

picture 2 is the part that has me confused. what it is is wires twisted together and tucked in between 2 poles. the tech said it was the beginning of the wire, and he did that so the stator isn't as high yield? I mentioned that the oem and one other aftermarket stator that i had previously never had that and assumed that the beginning and end met and were tied together then continued out of the stator to make one of the 3 phases coming out of the stator. He said thats a delta wound stator and it's high yield at 500watts Can you enlighten us on that. I personally call bullshit and think thats one of the main reasons the stators are crapping out.

picture 3 shows how long of a run the wires coming out of the stator have to go if have to follow the wire direction from the stator. i have to pretty much have the wires run underneath the stator for half the stator circumference before it goes out of the stator. Again, the oem and other one's wires exited the stator at pretty much the proper area so the run was short, up to the grommet.
 

Attachments

#38 ·
if you have three wires wound together and three single conductors soldered onto the stranded wire coming out of the cover then you have a "Y" wound stator. If on the other hand you have double wires soldered to each stranded wire then you have a delta wound stator. Both designs will work, but I prefer the delta winding method for a number of reasons.
 
#42 ·
Last little bit of winding!

since my stator only shorted on two poles, i really didn't have much damage done to the powdercoating. on most simple shorts like this, the heat from the short will burn the powdercoating and it will turn to a loose, gritty carbon. this will have to be removed to prevent your newly wound stator from shorting out aswell. theres two ways you can fix this. if the majority of the PC is good thern you can patch it with nomex or some other high temp paper insulation. if your PC is too far gone i would advise you invest in a cheap toaster oven and remove what you can with a dremmel and repowder coat it.

mine wasnt that bad, the pic is dar but you can see theres a fair amount of bare metal. i removed what i could with a sharpened screwdriver
http://i71.photobucket.com/albums/i156/MTXMUGEN/P1010029.jpg

Thios is nomex, basically a thick version of tyvek taper with some sort of plastic core.
http://i71.photobucket.com/albums/i156/MTXMUGEN/P1010030.jpg

I cut a few small pieces of the nomex to shape with a razor and then fit them inplace
http://i71.photobucket.com/albums/i156/MTXMUGEN/P1010032.jpg

I removed the pieces and started winding that first layer. to get that first turn without too much effort you can prebend itthen just slide it into place.
http://i71.photobucket.com/albums/i156/MTXMUGEN/P1010033.jpg
I then pinch it against the tooth with glass pliers. as you can see in the pic, there basically a old set of needle nose pliers that were ground and polished smooth
http://i71.photobucket.com/albums/i156/MTXMUGEN/P1010034.jpg

an this is the first layer. due to the the repair i was only able to get 12 turns before the second layer. this wont affect it too much. you can also see the nomex sticking outinfront of the lip.
http://i71.photobucket.com/albums/i156/MTXMUGEN/P1010035.jpg

you will want to get each turn as close to the previous one as possible and as close to the tooth as pssible. you can slide the wire down and compact the firt layer with glass pliers and a dulled plat head screw driver. to get the wire closer to the tooth you simply give then a squeeze with the glass pliers on the sides. to compress the layer tp ger more turns in just put the screw driver between the wire and the3 lip and twist. BE CAREFUL not to do either too hard so you dont gouge your wire. it is possible to short it going that and if you gouge it too much you will have to start over.

once you get all your turns in you will have to cross over. I put all my crossovers on the back side since theres ample room and theres a less chance of them getting hit by the rotor. your 3rd layer will end at the outside of the tooth so you can eiter com straight accross and tie it down or just simoply run the akward andle to the inside for the last 1/2 turn and make your cross. you can see the cross overs in this pic
http://i71.photobucket.com/albums/i156/MTXMUGEN/P1010028.jpg

this is what it looks like on the backside with 2 phases done
http://i71.photobucket.com/albums/i156/MTXMUGEN/P1010037.jpg
 
#45 ·
i too try to do a lot of the work myself. I for one like to work and learn about the bike, and also i think i can do just as good work for all of the minor things on the bike minus any engine overhaul ( which i could probably do myself as well). there is so much information out there for us to be able to do the work ourselves that unless you have no time to work on it, you can do a lot yourself and not make it as expensive a hobby as it could be.
 
#46 ·
I for one like to work and learn about the bike, and also i think i can do just as good work for all of the minor things on the bike minus any engine overhaul ( which i could probably do myself as well). there is so much information out there for us to be able to do the work ourselves that unless you have no time to work on it, you can do a lot yourself and not make it as expensive a hobby as it could be.
learning about the bike is overlooked by many, to me its one of the more important aspects of riding. i know people that don't even know the known problems for their bike and get all bent out of shape when it finally strikes their bike. It's nice to see there's still some people that do their own work.
 
#49 ·
I'll post pics of the completed stator tomorrow aswell as how to terminate the winds and placement. the stator is in the bike right now, i had it out on the road yesterday and all appears to be working as it should.

after the post on the final phase and termination ill go over a simple voltage peak filter that you can add to the stator to help reduce its affect on the ignition system. then ill go over other windig patterns and more theory, varnishing process, an then whatever we want to go over from thre.
 
#51 ·
Very impressive. Btw, what was the vac coming off the stator for you? And what vdc did you have at the battery at idle? I was getting 14.3 dc at the battery. I think that's a tiny bit low. No matter I'm changing all parts and go from there. Once the bikes working then I'll tackle the stator rewind.
 
#55 ·
Sorry for the lack of attention to this thread lately, ive been busy with work and im going through the process of switching jobs and my major. the time i have to work on the bike I usually spend riding it, its kinda like my treat after a days work.

I spoke to my friend, The EE who tought me how to wind in the first place. he gave me some interesting information about optimizing these things...

00blade and MACI4LIFE, your stators are wound with 16 AWG and terminated as a wye correct? from what my friend said, it isnt surprising that you two keep blowing your stator. for the motor versons, if certain motors are wound as a delta they will get a circulating current running through them. these currents cause all sorts of nasty things and are what usually blow the speed controllers and even the motors themselves. on a charging statr like these, the wye counterpart is what has the circuilating current problem. that could be why they just dont last in your machines. i was also told the difference between 16 and 18 guage wire is negligable for this use. it wont make a measurable difference.

whichever of you unwind your stator first, let me know ho many turns per pole it is. ill run the conversion for you and let you know how many turns you need to use a delta termination. that is your willing to stray from the stock;).

i was also told that even if you forget a few turns or add some on a pole it wont make much of a difference. this sounds too good to be true but i thought i would relay it anyway.

ill try to snap a few pics tomorrow of the stator and the peak filter. im curious to see how my stator is holding up. especially since its not varnished yet
 
#56 ·
00blade and MACI4LIFE, your stators are wound with 16 AWG and terminated as a wye correct? from what my friend said, it isnt surprising that you two keep blowing your stator. for the motor versons, if certain motors are wound as a delta they will get a circulating current running through them. these currents cause all sorts of nasty things and are what usually blow the speed controllers and even the motors themselves. on a charging statr like these, the wye counterpart is what has the circuilating current problem. that could be why they just dont last in your machines. i was also told the difference between 16 and 18 guage wire is negligable for this use. it wont make a measurable difference.
If this is the case Honda deserves a swift kick in the arse.
 
#58 ·
Sorry for the lack of updates on my project here. I've been in the process of switching jobs and havent had much time to spare. anyway, the stator is charging perfectly. i now have about 1500 miles on it since the last post here. i haven't even varnished it yet and it looks no different then when i first put it in the bike.

ill post how to varnish whenever i get the chance, hopefully pretty soon
 

Attachments

#61 ·
Update. Stator is varnished and is still working as exceedingly well as it did when i first put it in the bike almost 4k miles ago

varnishing tutorial coming soon!
great to hear.

it's been a little cold out and haven't started the rebuild yet.

would you want me to crack the old varnish off to measure the guage or just measure with varnish on?

eagerly awaiting the varnishing technique alons with what wires you used to finish off the 3 output wires to the harness. ( and how you joined them to the 18 guage wires, obviously soldered but i'd like to see how it looked )

also was there any special output wires that you used considering that some of that wire will be in the stator casing thus taking a lot of heat and getting coated in oil. I'm assuming that the regular rubber shielding that most wires use may not be durable enough.
 
#64 ·
I'm going to give this a try, my cronies at work say I'm nuts. But they ride harleys and wannabe harleys, all show and no go! So, what about the old varnish? The oven I will bake my complete stator in will only get to approx 450 deg. It would not melt off the old varnish. Do i find a hotter oven or just peel and chip away at the old varnish? Also, I was surprised at how loosely wrapped the wires were around the posts. It was obvious where mine failed. Let's get to the varnish part eh? Thanks for the GREAT tips!!
 
#65 ·
I am not sure if you can melt alredy cured varnish.. its usually just chars when heated but i am no expert when it comes to the stuff so i could be missing something.

i typically just let it chip and crack away as im unwinding the stator. its kind of a messy way of doing it but i know it works. just remember, a stator will only unwind in the reverse order it was wound due to overlapp bewteen poles. once you figure out that sequence then it typically goes pretty smooth with the typical pinch here or there.

as far as varnishing goes... i have yet to varnish the one in my bike and i havent had a lot of down time to start winding the other stator i have from my parts motor but i an working to change that.. ill post up a procedure as soon as i can
 
#66 ·
Thanks, I guess we are all learning something here. I may have some info to help you complete this story. A guy i know has a forklift repair business and he has varnished motors many times and said he would help me. He tried to cook the varnish off and 450 degrees did not melt it, he though more would work. Tonight, I took my torch to it, it did not drip off as expected. The torch only heated up the metal and appeared to potentially do more damage. He did sand blast the surfaces for better contact. When mine is varnished, i will repost the details. Thanks for the tip on removing the old varnish.
 
#67 ·
question for MTXMUGEN, I notice you're talking about AWG 16 or 17 for a delta-rewind, (From what I gather, that means 37 turns per pole) and some of the useless bastards here in europe are providing aftermarket STAR rewinds with 1.1mm (AWG 17) wire, with 25 turns per pole. . These don't last long.
I can imagine why they use star, it's less work. And less thickness is less expense. But the torrent of abuse they get for their @#$%^&*() work, you think they'd try harder. Oh well.....

Anyway, if I read your message clearly, we should be rewinding delta with 37 turns and AWG 17 minimum. Can you confirm?

and if I wanted to rewind star? What wire gauge? How many turns?
 
#71 ·
Well, i have never head of a "star" pattern before but a quick google search showed that it is just another name for a wye termination.

A wye is actualy a good way to terminate the wiress.. it uses less turns BUT to get the same amp capability, a wye terminated stator needs to use larger wire. for effeciency reasons i favor a delta termination over a wye for a charging stator. it looks better on a oscilloscope too :)

i believe i actually rewound with 16 AWG. with 16 you have to put a lot of effort into neatly stacking the wire or you will not get all your turns in... 17 would work but i wouldent go smaller then 18.. at least not without using multiple strands. the stock stator is 37 turns.
 
#68 ·
I have adopted the opinion that you should not waste your time with any aftermarket stators at all. Mine just went for the 4th time. I rewound by hand for the second time. I used #17 because I don't think I can wind it tight enough for #16. My first rewind was with #19 and I expected that to fail. (It lasted 7000km) We'll see how long this one lasts. Some things to consider... Many materials that may be used to rewind a stator are not heat/oil resistant enough. It is particularly hard on the wires that go from the windings to the connector. This time I used some #14 wire that is rated at 150C. I don't know how oil resistant it is.
 
#72 · (Edited)
not to be an @hole or anything but you really should be using a higher temp rated wire.. 150C does not give you a lot of room for error.even though normal engine temps are far below that mark, Your stator temp isnt. the oscillating magnetic fields produce heat(kind of like an induction furnace).. and to make it worse, theres no real source of cooling. . i would say 200C rated wire would be the minimum