Honda Motorcycles - FireBlades.org banner

How to: delete HTEV servo with no FI light

98K views 104 replies 33 participants last post by  Jason95826  
#1 · (Edited)
So there are a lot of one paragraph how to articles on how to remove the servo motor from your CBR 929 or 954 without throwing a FI code
by making a "servo delete" out of the plug off the servo motor. I found these articles to be intimidating do to the lack of pictures.
So I've taken the time to fully research how the exhaust servo works and how to trick the ECM to think there is still a functioning servo.

I've stuck with what works and used the same components all the how to articles out there tell you to buy. I fully explain where and
why you need to hook each resistor and the capacitor so you can copy this how to for any honda CBR with an exhaust servo (your wires will be different colors)... I know this because cbr 1000rr servo motors etc work in 929/954s... much like most regulator/rectifiers work in all the big four japanesse sport bikes Suzuki GSXR 1000, 750, 600, Yamaha R1/R6, Kawasaki Ninja 14r, 12r, 10r, 6r, 636.

Here's the printable version with just the text (scroll down for the full step by step):

Parts you need:

- 470uF capacitor (any wattage)
- 220 ohm resistor (any wattage)
- 4.7k ohm resistor (any wattage)

Supplies and tools you need:
-Metric allen keys (to remove seat)
-8mm socket wrench (front bolts of tank)
-12mm socket wrench (back bolt of tank on 929)
-wire cutters
-any cheap soldering iron ($5 walmart)
-lead free solder wire (home improvement store)
-solder paste (home improvement store)
-Silicone caulk

Steps:
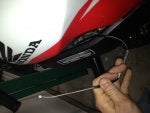
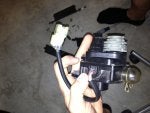
-Remove servo motor (raise the gas tank to access servo motor)
- cut off servo connector
- connect green/orange wire to negative terminal of capacitor
- connect one end of 220 ohm and 4.7k ohm to pos terminal of capacitor
- connect the other end of 220 ohm resistor to red wire
- connect the other end of 4.7k ohm resistor to turquoise/pink wire
- make sure wires aren't touching
- test the servo delete out by clearing the codes and reving bike up past 7K
- if it works remove the servo delete and seal it in silicone
- re-install servo delete on the plug
- re install tank
 
#5 ·
Image

Image

Image

How to clear a FI code on 929/ 954 and most honda motorcycles:
-Turn ignition OFF
-then bridge the terminals of the service check connector (as pictured).
-turn the ignition ON
-then disconnect the bridge wire from the service check connector.
-When the wire is removed the FI light should come on for approximately five seconds, during which time the bridging wire must be pluged back in.
-The warning light should start to flash when the bridging wire is reconnected, indicating that all the fault codes have been erased.
However, if the light flashes twenty times then the memory has not been erased and the procedure should be repeated.
-Turn off the ignition then remove the bridging wire.
-Check the operation of the warning light ( in some cases it may be necessary to repeat the erasing procedure more than once )
Image

Image
 
#8 ·
For the 600rr and 1000rr servo removal same process as above except the wire are these colors:
-hook the negative of the capacitor to the GREEN wire
-hook the positive of the capacitor to the 220 ohm resistor and 4.7kohm resistor
-hook the other end of the 220 ohm resistor to the RED wire
-hook the other end of the 4.7k ohm resistor to the BROWN wire
 
#11 ·
Radio shack would work, note the packages in his pics are from radio shack. If you had the time to wait for online shipping you could probably find the stuff online for less. But you would be saving like $2.

Kudo's to Matt this write up is excellent! Before I got to Fireblades I almost spent $60 on the ebay servo delete :eek: glad I didn't now.
 
#12 ·
Anyone else having problems with this working? I finally got around to doing the Servo delete tonight and I did this method with the exact same parts he got from Radio Shack.

I have been getting code 34 so I figured this would fix it but so far no luck. I even swapped out the resistors to see if maybe I installed a bad one and that didnt help.

I installed this, did the ECU Reset procedure, and after the reset I'm still getting this code.

I have a question, during the ECU Reset procedure, am I supposed to do something at the end of the reset while the red light is blinking? After the reset procedure, the red light keeps blinking 100+ times and never stops. Am I supposed to wait until after the red light stops blinking to confirm it went correctly? Or do I just turn the key off while its blinking? I just turned the key off while it was blinking but my code 34 was still there.
 
#16 ·
here's what i got right now going on:

I opened airbox and removed all the flapper stuff with all the gold screws. Removed the springs too. Everything is out. (picture #1). Now the cable that goes up through the bottom of the airbox is still there. Just not connected to anything.(photo 2). Some people say leave it and dont worry about it, others say remove it and plug hole. Others say remove it and do nothing with hole.????

Next I have removed the exhaust valve controller thingy all together. Unplugged it and removed the 2 cables from it going down to exhaust pipes. (pic #3). Isnt there a better way to "trick" the computer and not have to install resisters and capacitors, etc etc? I dont mind leaving this mounted and having plug connected. But just no cables. Or is that a problem?

Last i have the 2 cables that are still connected to the flapper on the exhaust pipes down below. The cables are connected at exhaust pipes but they dont go anywhere. I know that if I pull EITHER cable to its max (by hand), the flappers inside pipes are wide open. So, as you can see, one of the cables is pulled all the way out so the flappers are open. (pic 4). Isnt there a better way to keep these flappers wide open? Get that HAAS piece maybe? are those even still around?

If I start up the bike as is, it throws the 34 code and idles very low. I can rev it and it sounds fine (except for lower exhaust rattle sound) ... but starts sluggish and idles low and depressing. wtf is the best solution? Get a full pipe?
 

Attachments

#18 ·
There are no "flappers", it's a simple rotary valve.
Remove the cables.
Use wire to tie the valve in one of the three positions, I recommend you actually try it in all three to determine which suits your riding best.
 
#27 ·
Great pic! I experimented a lot after my servo broke and ended up rotating mine to the the last position where the flat part is at the top of the exhaust. I ride mostly track, and that position is best for high rpms (as noted) . On mine, in the first and second positions, the bike seemed to chug at WOT, sounded like it was running on three cylinders and had no power past 7000 rpms, which makes sense now!
I safety wired it to hold it there and I have no worries now. I haven't done the plug fix yet, so I still get the FI light and codes, but it doesn't bother me that much.
I found that the bike runs much stronger if you get a fuel management system to help smooth out things. I put a Bazzaz with the self tuner on mine and it's a beast now! :thumb:
 
#32 ·
Did you reset the computer after doing the servo delete? Just fixing the HTEV in place will not turn the light off. The best position will depend on the type of riding you do mostly. I found that rotated full open worked best for me. You lose a bit of low end, but it pulls strong in the upper revs.
 
#37 ·
I see a few people having troubles with this. So am I sadly. So I was getting a code 35. My procedure went like so. Removed the door inside of the intake box removed the Servo cut the plug. Set the exhaust to the 180 degree position. Setup my capacitor negative to green positive with the 220 ohm on red and 4.7k ohm on light green\teal\torquise whatever color wire. Setup everything reset light and now I receive a code 34. Anyone got any suggestions?
 
#38 ·
This method is crap! If you notice in the original post the resistors are gold to the wires for the "test". Then for the final solder step the resistors are red and purple to the wires. Who is this guy? You shouldn't trust someone that doesn't pay attention to detail. Should have put that $10 toward the servo buddy.